Guide: how to flash Galaxy Note 3 flash to PagePlus with 3G data step by step
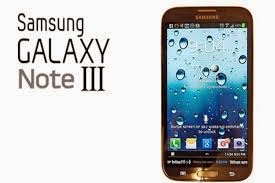
The Samsung Note 3 is currently the best specced phone available running Android. It’s also the most expensive. Fortunately, PagePlus users tend to be frugal, and I’m no exception. I took a chance on a used Sprint Note 3 with a bad ESN (doesn’t matter if flashing it to verizon) and a “Locked SIM.” A few dings around the bezel (but not a scratch on the screen) only sweetened the deal further. I made away like a bandit, getting this flagship phone for half its MSRP and nearly the same price as phone subsidized on a 2-year contract. I just had to make it work.
Prepare your PagePlus Account
- Register your phone with PagePlus. I chose to go through Kitty Wireless, an authorized dealer, as they will take care of monthly billing with the 1200 Plan. I’m also a member of the Level 2 ”Crazy Kitty PIN Rebate Club ” which gives a discounted rate on plans – $26.97/mo vs $29.99/mo – it adds up over time, especially with multiple lines. This club is only offered at select times during the year, and costs a one-time fee of $100 to join.
- Make sure to supply the MEID correctly when your register your device – you need to remove the last digit (because it is 4G capable) for the order to go through. For example,mine was 990000xxxxxx223. I supplied 990000xxxxxx22. Should end up being 14 digits instead of 15.
- Wait for the order confirmation email. You’ll need the following: Phone # (MDN), MIN (MSID), and SID. For the SID, you need to call PagePlus at 800-550-2436. Expect to wait a while.
- You may or may not need a SIM card. Furthermore, that SIM card may or may not need to be from Verizon, and it may or may not matter whether it has already been activated. This totally depends on your phone. For the Sprint Note 3 that I used, a SIM card was unnecessary. The verizon model of the same phone however often requires one. This will require some googling on your part.
- For 3G data (upload / download speeds >1mbps, ping <200ms 3g="" a="" already="" any="" are="" be="" buying="" can="" cdma="" compatible="" convoy="" dfs="" do="" drawer="" dumbphone="" f="" google="" have="" his="" in="" is="" make="" may="" nbsp="" need="" not="" ol="" one="" only="" onor="" or="" ou="" phone="" quick="" samsung="" search="" smartphone.="" somewhere.="" style="border: 0px; font-family: inherit; font-size: inherit; font-style: inherit; font-variant: inherit; font-weight: inherit; line-height: inherit; list-style: upper-alpha inside; margin: 0px 0px 0px 1.25em; padding: 0px; vertical-align: baseline;" supports="" sure="" that="" the="" to="" u640="" used="" verizon="" will="" with="" workshop.="" you="">
- You may skip this step, but you will be limited to 1X data (upload/download speeds of 0.1mbps, and most painful – pings of 700-1200ms).
- Note: you may also be able to get away with a Sprint phone as a donor, but lets not complicate things, shall we? Phones are cheap on eBay.
Ready your Computer
- Download this file (45.2MB). It contains several files necessary for the process.
- Install the 32-bit or 64-bit USB drivers for your phone (not provided)
- Download DFS from: http://www.cdmatool.com/download. Make sure you get DFS and not iDFS. Install it and create an account – you can get by with the Demo version just fine.
- Use the 60008 PRL provided (recommended) or download one here.
Preparing to Flash
Your phone may need to be rooted and/or have an unlocked bootloader. More importantly, make sure you have the latest ROM of your choice installed before flashing, and MOST importantly, ensure that the baseband / modem (check this in settings / status) is compatible with flashing to PagePlus or your desired MVNO. I will go through this in the case of the Sprint Note 3 (SM-N900P):
Part 1 – Update Android / ROM, obtain Root, flash Modem
- As always, it is a good idea to make a full backup before starting.
- TWRP recovery is easy to install via the free goomanager app
- I grabbed the latest official (TouchWiz) build of Android 4.4.2 KitKat: N900PVPUCNAB and installed it using Odin 3.09.
- Unfortunately, the NAB modem that is installed with this update is not compatible with PagePlus. No problem, we now just have to flash an earlier version of the modem ONLY (again using Odin just as before), which you can find in the download above (modem.tar).
- We can then Root android, again using Odin and loading “CF-Auto-Root-hltespr-hltespr-smn900p”.
- This is a good time to disable the pesky KNOX security software, though this step is not necessary for flashing.
- Make another backup of your shink new 4.4.2 ROM
Part 2 – Set USB mode to MODEM
- Enable USB Debugging. Settings –> About Phone –> Tap “Build Number” 7 times to enable the development menu. Then go to it (Settings –> Development) and make sure Enable USB Debugging is checked.
- Enable “Install apps from unknown sources” in the security settings.
- Install Samsung Android SPC Utility (apk provided) and press “Read SPC” – write this down.
- Dial ##3424# (DATA) to enter the PhoenUtil menu, and change the Qualcomm USB Setting to DM+MODEM+ADB or RMNET+DM+MODEM – either will work.
- The phone is now ready for flashing.
Reading settings with DFS
Before we start, we need one last password. For Samsung devices, check here. The 16 Digit Password that worked for my Sprint Note 3 was 2012112120131219.
DFS – READ; do NOT click write on anything yet
- Make sure the SIM card is removed.
- Turn on phone and connect to USB – ensure drivers are detected and installed.
- Start DFS. Open “Ports”, select the COM port belonging to the phone.
- DFS should establish a connection and read the status and diagnostic info.
- Enter your SPC and click the button (log should indicate “UNLOCKED”)
- Enter your 16-digit password and click the button (log should indicate “UNLOCKED”)
- Go through each section of the equipment and programming tabs and click READ for each subsection. Then MAKE SCREENSHOTS of your default values.
- Go to programming –> General and copy your MEID (14 digits HEX; ignore the two digits in the second box if present)
- Turn OFF your phone. This is important.
Flashing Donor Phone / Obtaining HA, AAA Keys
Put aside your POWERED OFF phone and grab the donor. Do NOT EVER have the two of these devices powered on at the same time with the same MEID (which they will have shortly). This would be illegal according to the FCC.
DFS – Flash the donor
- Connect your donor phone to your computer and open DFS.
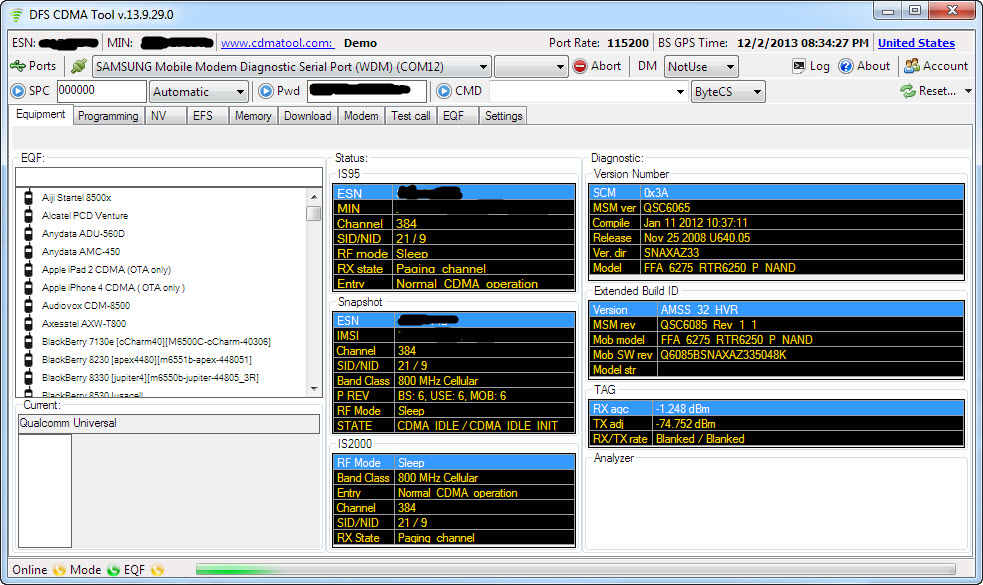
- Establish a connection with your phone. Click Ports, and select the COM interface you donor is connecting on. This will vary by model. Here’s what mine looked like:
- Send the SPC code (mine was 000000). Yours probably is too.
- Send the Pwd (mine was 2008110120090528). This is unique to the model of phone.
- Go to the Programming / General tab and READ your MEID.
- SAVE THIS - you will want to restore it after finishing.
- Write the MEID from your Note 3. (and READ it back to verify it stuck).
- Reboot your donor phone and follow the prompt to activate it (or dial *228). It will now have your PagePlus phone number and should be fully functional. You have switched phones on a CDMA carrier without having to call support to perform an ESN change. Epic win.
- Verify the 3G icon is present and do something that uses data (mobile web, send an MMS). This will just ensure the AAA and HA keys are updated.
- Connect the donor back to DFS and send the SPC and Pwd again as before.
- Go to the Programming / Mobile IP tab and copy the AAA and HA Shared Secrets in HEX format.
- Go back to Programming / General and restore the original MEID. Read it back to ensure it was written, and reboot or shut off the donor phone. Its job is finished.
Flashing your Note 3 (or whatever)
Make sure you have your backups / screenshots of original settings!
DFS – Now you can WRITE
- Make sure the SIM card is removed.
- Turn on phone and connect to USB – ensure drivers are detected and installed.
- Start DFS. Open “Ports”, select the COM port belonging to the phone.
- DFS should establish a connection and read the status and diagnostic info.
- Enter your SPC and 16-digit password
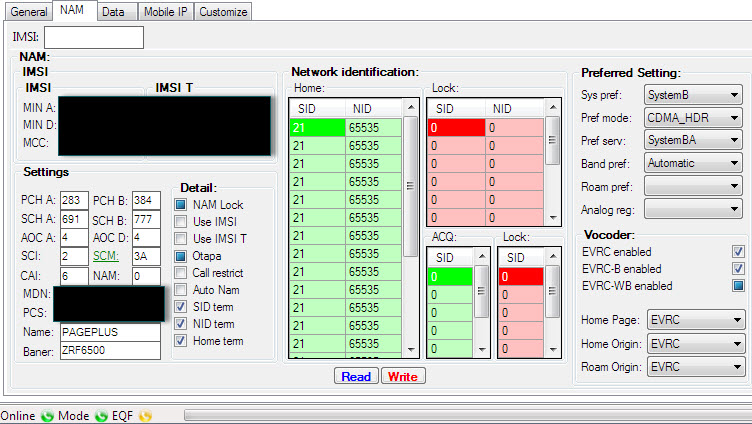
- In Programming / NAM, write the following:
- IMSI (leave IMSI T unchanged)
- MIN A and MIN D = your MIN / MSID (not phone number)
- MCC = 310; MNC=00
- Enter your MDN into both the SPC and MDN fields
- Set your SID (NID should be 65535)
- Check the remaining boxes to match this and then click WRITE:DFS: Programming / NAM
- IMSI (leave IMSI T unchanged)
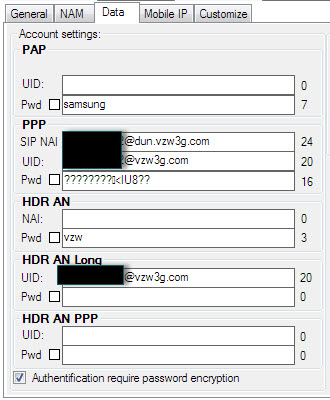
- In Programming / Data, write the following:
- PPP
- SIP NAI: “Your MDN”@dun.vzw3g.com
- UID: “Your MDN”@vzw3g.com
- PWD: vzw (box unchecked)
- HDR AN
- NAI: “Your MDN”@vzw3g.com
- PWD: vzw (box unchecked)
- HDR AN Long
- UID: “Your MDN”@vzw3g.com
- PWD: vzw (box unchecked)
- I will make a brief note here to remark that some of these values were erased when changing the baseband on my phone (which I did out of order of this guide) and I ended up with this. It still worked (and I have learned not to mess with things that are working).
- Check the remaining boxes to match this (Hybrid preferred can be Enabled):DFS: Programming / Data
- Click WRITE
- PPP
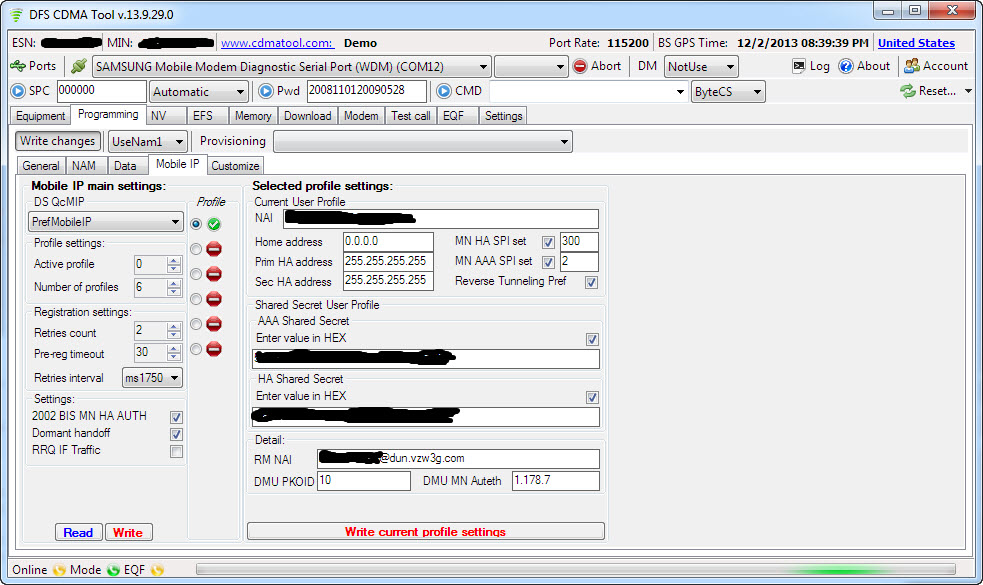
- In Programming / Mobile IP, write the following:
- Under profile column:
- Select the first bubble and make active (Right click, enable profile)
- Make sure all other profiles are Disabled (Right click, Disable profile)
- Under Mobile IP main settings
- DS QcMIP: PrefMobileIP
- Active profile: 0
- Number of Profiles: 1
- Retries count: 2
- Pre-Reg timeout: 30
- Retries interval: ms1750
- 2002 BIS MN HA AUTH: checked
- Domant handoff: checked
- PRQ IF Traffic: unchecked
- Click WRITE
- Under Selected profile settings
- NAI: “Your MDN”@vzw3g.com
- Home address: 0.0.0.0
- Prim HA address 255.255.255.255
- Sec HA address 255.255.255.255
- MN HA SPI set: Check box; 300
- MN AAA SPI set: Check box; 2
- Reverse Tunneling pref: Check box
- AAA Shared Secret
- Enter 32-digit value in HEX: Check Box
- HA Shared Secret
- Enter 32-digit value in HEX: Check box
- RM NAI : “Your MDN”@dun.vzw3g.com
- DMU PKOID: 10
- DMU MN Auteth: 1.178.7
- CLICK ON ” Write current profile settings” – do this 2x to make sure everything stuck
- Under profile column:
- Finally, lets go back to Programming / NAM, and write the PRL:
- First READ and then SAVE your current PRL
- Then LOAD and WRITE the 60008 PagePlus PRL
- The radios will reboot/reset after doing this
- Done! Click Reset in the top right, and restart phone!
- Disconnect from DFS and unplug your phone.

Finishing Touches
- Once phone is restarted:
- Dial ##3282# click Edit Mode
- Enter your MSL / SPC code
- Click on EVDO then Click on DDTM and make sure it is Enabled. Then hit okay and then hit the back key
- Click on eHRPD and set to Off then hit ok.
- Click on LTE and Disable that also, and click ok.
- Youtube streaming and MMS:
- Click Multimedia then click on RTSP/HTTP
- RTSP proxy ip: 0.0.0.0
- RTSP proxy port: 0
- HTTP proxy ip: 0.0.0.0
- HTTP proxy port: 0
- Then click on MMSC menu item
- Name: PP (whatever you want)
- MMSC: HTTP://MMS.VTEXT.COM/SERVLETS/MMS or http://mms.vtext.com/servlets/mms?X-VZW-MDN=PHONENUMBER
- MMS Proxy: Leave Blank or 0.0.0.0
- MMS Port: 80 or 8080
- MMS Protocol: WAP 2.0
- Done! Reboot phone
- Verify you can connect to PagePlus (*611) and that you have an EVDO Rev. A data connection. Use Speedtest to verify 3G speeds / ping.
- Remember – NEVER dial *228 or any of its variations unless you wish to repeat all of the above steps again.
Troubleshooting
Call PagePlus at (800) 550-2436 and verify your ESN / IMEI is correct and in their system. I had mistyped a digit in mine when flashing the Galaxy Nexus and spent hours trying to figure out why it wasn’t working before realizing it.
3G not working? Try the following:
- Make sure you followed the flashing guide closely.
- Your Profile 0 and/or Profile 1 AAA key may be wrong.
- You may have wrong APN settings.
- Phone network should be set to CDMA. Go to System Settings, More Settings, Mobile Networks, Network Mode should be set to “CDMA”
- Try using your AAA password instead of “vzw” in the NAM settings (check the box when entering in HEX).
If all else fails…Nuke it from orbit. Use Odin to do a full wipe and reflash to stock android and start anew.